
ចំពោះ Blogging system យើងត្រូវការ database table ចំនួន៤ ដូចជា, Users, Categories, Tags, និង Posts ។ បើសិនជាអ្នកចង់បង្កើត functions សម្រាប់ blog របស់អ្នកសម្រាប់ធ្វើការ comment នោះអ្នកអាចនឹងត្រូវការតារាងមួយទៀតគឺតារាង comments សម្រាប់ឧទាហរណ៍នេះអ្នកអាចបន្ថែមតារាងបានដោយខ្លួនឯង។ ដើម្បីធ្វើឲ្យមេរៀននេះកាន់តែខ្លីហើយងាយស្រួលយល់ មានរបស់ ៤ យ៉ាងដែលយើងត្រូវការ។ ប៉ុន្តែមុនដំបូងពួកយើងត្រូវការ setup database របស់ពួកយើងជាមុនសិន។
1. User Table
🌹1.1 Design

🌹1.2 User Migration
Migration អាចកំណត់រចនាសម្ព័ន្ធសម្រាប់ database table ដែលត្រូវគ្នា។ ចំពោះ migration file គឺមានស្រាប់នៅក្នុង Laravel:
database/migrations/create_users_table.php:
use Illuminate\Database\Migrations\Migration;
use Illuminate\Database\Schema\Blueprint;
use Illuminate\Support\Facades\Schema;
class CreateUsersTable extends Migration
{
/**
* Run the migrations.
*
* @return void
*/
public function up()
{
Schema::create('users', function (Blueprint $table) {
$table->bigIncrements('id');
$table->string('name');
$table->string('email')->unique();
$table->timestamp('email_verified_at')->nullable();
$table->string('password');
$table->rememberToken();
$table->timestamps();
});
}
/**
* Reverse the migrations.
*
* @return void
*/
public function down()
{
Schema::dropIfExists('users');
}
}
🌹 1.3 User Model
Model ជាអ្នកទទួលខុសត្រូវផ្នែករៀបចំទិន្នន័យសម្រាប់ store ទុកនៅក្នុង database table។ ប៉ុន្តែដើម្បីអាចធ្វើដូច្នោះបាន ពួកយើងត្រូវការបញ្ជាក់ពី column ដែលត្រូវបានបង្កើត។
ចំពោះ model សម្រាប់ "users" table គឺត្រូវបានបញ្ចូលទៅកាន់ laravel យ៉ាងល្អ។
app/User.php:
namespace App;
use Illuminate\Contracts\Auth\MustVerifyEmail;
use Illuminate\Foundation\Auth\User as Authenticatable;
use Illuminate\Notifications\Notifiable;
class User extends Authenticatable
{
use Notifiable;
/**
* The attributes that are mass assignable.
*
* @var array
*/
protected $fillable = [
'name', 'email', 'password',
];
/**
* The attributes that should be hidden for arrays.
*
* @var array
*/
protected $hidden = [
'password', 'remember_token',
];
/**
* The attributes that should be cast to native types.
*
* @var array
*/
protected $casts = [
'email_verified_at' => 'datetime',
];
}
2. Categories Table
🌹 2.1 Design
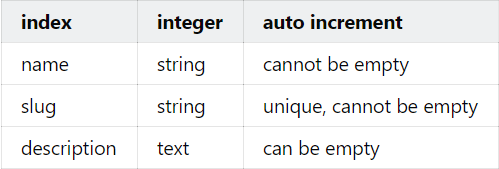
🌹 2.2 Categories Migration
យើងអាចប្រើប្រាស់ tools របស់ Laravel Artisan tool ដើម្បី generate Model ហើយនឹង migration ដែលត្រូវគ្នានឹងវា ដោយគ្រាន់តែវាយបញ្ចូលនូវ command line ខាងក្រោមនៅក្នុង terminal:
database/migrations/create_categories_table.php:
{
Schema::create('categories', function (Blueprint $table) {
$table->bigIncrements('id');
$table->timestamps();
});
}
នៅក្នុង Line ទី៤ bigIncrements('id') method នឹងបង្កើត index column ជាប្រភេទ "bigInteger" ដែលមានឈ្មោះថា "id" ។ នៅ line ទី៥ "timestamps()" បង្កើតនូវ column ចំនួនពីរដែលផ្ទុកនូវ time ពេលដែល record ត្រូវបាន create និង update ។
ឥឡូវពួកយើងអាចបន្ថែមនូវ column សម្រាប់ database ។
{
Schema::create('categories', function (Blueprint $table) {
$table->bigIncrements('id');
$table->string('name');
$table->string('slug')->unique();
$table->text('description')->nullable();
$table->timestamps();
});
}
នៅក្នុង line ទី៦ unique() មានន័យថារាល់ record នៅក្នុង column "slug" គឺ unique ឬពុំអាចមានតម្លៃស្ទួន។
នៅក្នុង line ទី៧ nullable() មានន័យថារាល់ record នៅក្នុង column អាចនឹង empty, nullable(false) មានន័យថា column ហ្នឹងមិនអាចទទេបានទេ។
ទាំងអស់នេះគេហៅថា modifiers, ពួកវាជាព័ត៌មាននៃការកំណត់លក្ខណៈបន្ថែមដែលទាក់ទងនឹង column ។
🌹 2.3 Categories Model
app/Categories.php:
namespace App;
use Illuminate\Database\Eloquent\Model;
class Category extends Model
{
/**
* The attributes that are mass assignable.
*
* @var array
*/
protected $fillable = [
'name',
'description',
'slug',
];
}
ទីនេះ គឺពួកយើងបង្កើតតែ $fillable, Laravel នឹងសន្មតថាតារាងដែលត្រូវគ្នានឹង "Categories", ហើយ "$primaryKey" គឺ "id" ។ បើសិនជាមិនមែនជាវាអ្នកត្រូវបញ្ជាក់បន្ថែមដូច្នេះ ។